Flame Sensor Cleaning
The flame sensor is a critical safety component in your gas furnace that detects when the burner is properly lit. When it becomes dirty or corroded, your furnace may short cycle, fail to ignite, or shut down unexpectedly. Learning proper cleaning techniques can restore reliable operation and prevent costly service calls in North Texas’s demanding heating season.
Key Safety Points:
- Always turn off gas and electrical power before beginning work
- Flame sensors are delicate - handle with extreme care
- Use only appropriate cleaning materials to avoid damage
- Professional inspection recommended if problems persist
- Improper installation can create dangerous conditions
- Annual cleaning prevents most flame sensor failures
Understanding Your Flame Sensor
What is a Flame Sensor?
The flame sensor is a metal rod that extends into your furnace’s combustion chamber. When gas ignites, the flame creates an electrical current between the sensor and the grounded burner assembly. This current signals the control board that combustion is occurring safely.
How Flame Sensors Work:
- Detect presence of flame through electrical conductivity
- Send microamperage signal to control board
- Allow continued gas flow only when flame is detected
- Shut off gas valve if flame is not sensed within 4-10 seconds
- Critical safety function prevents gas accumulation
Common Flame Sensor Problems:
- Carbon buildup from incomplete combustion
- Corrosion from moisture and condensation
- Physical damage from improper handling
- Loose electrical connections
- Incorrect positioning relative to flame
SAFETY WARNING
Working with gas appliances requires extreme caution. Turn off gas and electrical power before starting. If you’re uncomfortable with any step, call our certified technicians.
Signs Your Flame Sensor Needs Cleaning
Furnace Behavior Symptoms
Short Cycling:
- Furnace starts normally then shuts off after 30-60 seconds
- Ignition sequence repeats multiple times
- Eventually enters lockout mode requiring reset
- Most common flame sensor symptom
Ignition Failures:
- Gas valve opens but ignition doesn’t occur
- Multiple ignition attempts before success
- Intermittent operation - works sometimes, fails others
- May indicate partial sensor contamination
Complete Shutdown:
- Furnace won’t start at all
- No response to thermostat calls for heat
- Control board shows error codes
- Indicates complete sensor failure
Visual Inspection Indicators
Sensor Appearance:
- White or gray buildup on sensor rod
- Black carbon deposits
- Corrosion or rust on metal surfaces
- Bent or damaged sensor rod
Combustion Chamber Conditions:
- Soot accumulation around burners
- Yellow or orange flame colors (should be blue)
- Uneven flame patterns
- Indicates combustion problems affecting sensor
Tools and Materials Required
Essential Tools
Basic Tool Kit:
- Screwdriver set: Phillips and flathead, various sizes
- Fine steel wool (0000 grade): For gentle cleaning
- Emery cloth (220-320 grit): Alternative cleaning material
- Digital multimeter: For electrical testing
- Work gloves: Protection from sharp edges
- Safety glasses: Eye protection during cleaning
Additional Helpful Tools:
- Flashlight or headlamp: Illuminate work area
- Camera or smartphone: Document original position
- Needle-nose pliers: Handle small components
- Wire brush (soft bristles): Remove stubborn deposits
Cleaning Materials
Approved Cleaning Agents:
- Fine steel wool (0000 grade only): Primary cleaning method
- Emery cloth: For heavy corrosion
- Electrical contact cleaner: For final cleaning
- Compressed air: Remove loose debris
Materials to AVOID:
- Sandpaper (too abrasive)
- Chemical cleaners or solvents
- Water or wet cleaning methods
- Steel wool coarser than 0000 grade
- These can damage the sensor permanently
Step-by-Step Cleaning Procedure
Step 1: Safety Preparation
Power Shutdown:
- Turn thermostat to “OFF” position
- Shut off electrical power at furnace switch
- Turn off gas supply at furnace gas valve
- Wait 30 minutes for components to cool
- Verify power is off with multimeter
Work Area Preparation:
- Clear area around furnace for safe access
- Ensure adequate lighting
- Have tools and materials organized
- Take photos of sensor position before removal
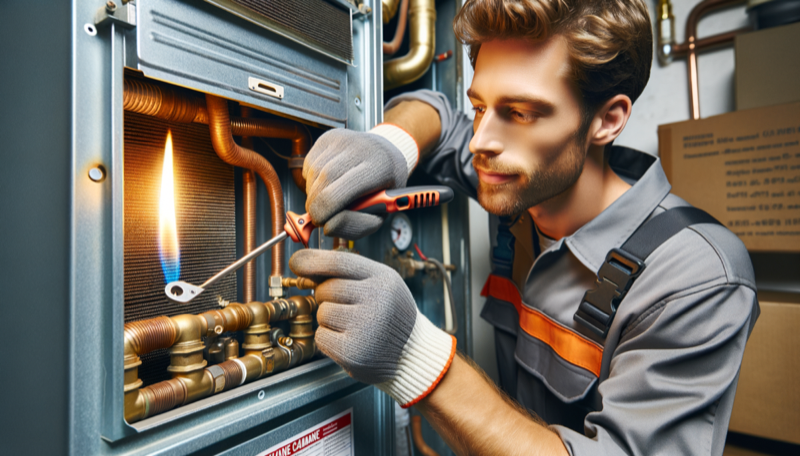
Step 2: Access the Flame Sensor
Remove Furnace Panels:
- Remove upper and lower access panels
- Locate burner assembly and control board
- Identify flame sensor rod extending into combustion chamber
- Note: Sensor is typically a thin metal rod near burners
Locate Electrical Connection:
- Find wire connection at sensor base
- Note connection type (spade connector or threaded)
- Take photo of wiring configuration
- Label wires if multiple sensors present
Step 3: Remove the Flame Sensor
Disconnect Electrical:
- Carefully remove wire connector
- Avoid pulling on wire - grasp connector body
- Set wire aside to prevent damage
- Check for corrosion at connection point
Remove Mounting Hardware:
- Unscrew sensor mounting bracket (usually single screw)
- Carefully withdraw sensor from combustion chamber
- Avoid touching sensor rod with bare hands
- Handle only by mounting bracket
Step 4: Clean the Sensor
Initial Assessment:
- Examine sensor for damage or excessive wear
- Note type and extent of contamination
- Check for bent or cracked rod
- Replace if physically damaged
Cleaning Process:
- Gently polish sensor rod with fine steel wool
- Work lengthwise along the rod, not across
- Remove all buildup until metal is shiny
- Clean mounting threads if corroded
- Blow away debris with compressed air
Final Inspection:
- Sensor rod should be bright, clean metal
- No scratches or gouges from cleaning
- Mounting threads clean and undamaged
- Replace if cleaning doesn’t restore proper appearance
Step 5: Testing and Reinstallation
Electrical Testing (Optional):
- Use multimeter to check sensor resistance
- Normal reading: 1-10 ohms between rod and ground
- Infinite resistance indicates broken sensor
- Professional testing recommended if uncertain
Reinstallation Process:
- Position sensor at original location and angle
- Secure mounting bracket with appropriate torque
- Reconnect electrical wire ensuring tight connection
- Verify proper sensor position relative to burner flames
- Replace furnace panels before testing
Testing and Verification
Initial Startup Procedure
System Restart:
- Turn on gas supply at furnace valve
- Restore electrical power at furnace switch
- Set thermostat to call for heat
- Observe complete ignition sequence
- Monitor for proper operation through full cycle
Performance Verification:
- Burner should ignite within 10 seconds
- Flame should remain stable throughout operation
- No short cycling or unexpected shutdowns
- Blue flame color with minimal yellow tips
Troubleshooting Continued Problems
If Issues Persist:
- Double-check sensor position - must be in flame path
- Verify electrical connections are clean and tight
- Inspect for other combustion problems affecting flame quality
- Consider professional diagnosis for complex issues
When to Replace Instead of Clean:
- Sensor rod is bent, cracked, or severely corroded
- Cleaning doesn’t resolve operational problems
- Multiple flame sensors in system are failing
- Professional assessment indicates replacement needed
Professional vs. DIY Considerations
When DIY is Appropriate
Good Candidate Scenarios:
- Basic mechanical aptitude and comfort with tools
- Ability to follow safety procedures carefully
- Problem is clearly isolated to dirty flame sensor
- No other furnace performance issues present
DIY Advantages:
- Cost savings on service call fees
- Learning experience for homeowner
- Immediate resolution of minor problems
- Satisfaction of successful repair
When to Call Professionals
Professional Service Recommended:
- Multiple system problems or complex symptoms
- Uncomfortable working around gas appliances
- Repeated flame sensor failures
- Any safety concerns during inspection
Professional Services Include:
- Complete combustion system analysis
- Replacement of worn or damaged components
- Gas pressure testing and adjustment
- Comprehensive safety inspection
Prevention and Maintenance
Regular Maintenance Schedule
Annual Tasks (Fall):
- Professional heating system inspection
- Flame sensor cleaning and testing
- Combustion analysis and adjustment
- Complete safety verification
Monthly Tasks (Heating Season):
- Visual inspection of furnace operation
- Filter replacement as needed
- Listening for unusual sounds or behaviors
- Monitoring for performance changes
Factors Affecting Sensor Life
Environmental Conditions:
- High humidity increases corrosion risk
- Dusty conditions accelerate contamination
- Poor combustion air quality affects sensor life
- North Texas climate creates moderate risk factors
System Factors:
- Proper gas pressure ensures clean combustion
- Adequate combustion air prevents incomplete burning
- Regular filter changes reduce contamination
- Well-maintained systems have longer sensor life
Cost Analysis and Replacement Options
DIY Cleaning Costs
Material Costs:
- Steel wool and emery cloth: $5-10
- Electrical contact cleaner: $8-15
- Basic tools (if needed): $20-50
- Total DIY cost: $35-75
Time Investment:
- Learning and preparation: 30-60 minutes
- Actual cleaning process: 30-45 minutes
- Testing and verification: 15-30 minutes
- Total time commitment: 1.5-2.5 hours
Professional Service Costs
Service Call Costs:
- Diagnostic and cleaning: $150-250
- Sensor replacement: $200-350
- Complete tune-up with cleaning: $250-400
- Emergency service: Add $100-200
Replacement Sensor Costs:
- Standard flame sensor: $25-75
- OEM replacement parts: $50-125
- Universal sensors: $20-50
- Professional installation: $100-200
North Texas Specific Considerations
Regional Factors
Climate Impact:
- High humidity during summer increases corrosion
- Rapid temperature swings stress components
- Occasional ice storms can affect venting
- Moderate conditions generally favorable for equipment
Usage Patterns:
- Seasonal heating demands vary significantly
- Extended periods of non-use followed by heavy operation
- Flame sensors may accumulate debris during idle periods
Local Service Availability
Professional Resources:
- Multiple qualified HVAC contractors available
- Parts readily available from local suppliers
- Same-day service possible for most areas
DIY Support:
- Hardware stores carry basic cleaning supplies
- YouTube and online resources widely available
- Local contractors often provide phone consultation
FAQ: Flame Sensor Cleaning
Q: How often should I clean my flame sensor? A: Most flame sensors benefit from annual cleaning during fall maintenance. However, if your furnace experiences short cycling or ignition problems, cleaning may be needed more frequently. Systems with poor combustion or dirty conditions may require cleaning every 6 months.
Q: Can I use sandpaper to clean a flame sensor? A: No, sandpaper is too abrasive and will damage the sensor. Use only fine steel wool (0000 grade) or emery cloth. The goal is to remove buildup while preserving the sensor’s smooth surface finish.
Q: Why does my flame sensor keep getting dirty? A: Frequent contamination usually indicates combustion problems such as improper gas pressure, inadequate combustion air, or burner alignment issues. Have a professional evaluate your system if repeated cleaning is required.
Q: How do I know if my flame sensor is positioned correctly? A: The sensor should extend into the flame path so that the flame envelops the sensor rod. If positioned too far from the flame, it won’t detect ignition properly. Take photos before removal to ensure correct reinstallation.
Q: Is it safe to bypass a flame sensor temporarily? A: Never bypass or disable a flame sensor. This critical safety device prevents gas accumulation that could lead to explosions. If the sensor fails, repair or replace it immediately before operating the furnace.
Q: What causes a flame sensor to fail completely? A: Physical damage from improper handling, severe corrosion, electrical connection problems, or manufacturing defects can cause complete failure. Sensors typically last 10-15 years with proper maintenance.
Q: Can I clean other types of flame sensors the same way? A: Different furnace models may have different sensor types. While cleaning methods are similar, always consult your owner’s manual for specific procedures. Some newer sensors may have special coatings that require different cleaning approaches.
Q: How do I prevent flame sensor problems? A: Regular annual maintenance, proper filter changes, ensuring adequate combustion air, and maintaining correct gas pressure all help prevent sensor contamination. Address any combustion problems promptly to avoid sensor damage.
Q: What should I do if cleaning doesn’t solve the problem? A: If cleaning doesn’t restore proper operation, the sensor may need replacement, or there may be other system problems affecting combustion. Professional diagnosis can identify issues like gas pressure problems, control board failures, or venting issues.
Q: Are universal flame sensors as good as OEM parts? A: Quality universal sensors can work well, but OEM parts are designed specifically for your furnace model. If you’re doing the work yourself, universal sensors offer cost savings. For professional installation, OEM parts often come with better warranties.
Need Professional HVAC Service?
Our certified technicians are ready to help with repairs, maintenance, and installations.
24/7 Emergency Service • Licensed & Insured • Satisfaction Guaranteed
Last Updated: August 18, 2025
Jupitair HVAC serves all of North Texas including Plano, Frisco, McKinney, Allen, and surrounding areas. TACLA License #123456.

Jupitair HVAC Team
Licensed HVAC Professionals
Our team consists of licensed HVAC technicians and comfort specialists with over 15 years of experience serving North Texas. We're committed to providing honest, expert advice to help homeowners make informed decisions about their heating and cooling systems.
Credentials & Experience
Service Areas
Related Topics
Need Professional HVAC Service?
Our certified technicians are ready to help with repairs, maintenance, and installations.